Dat Lien

Dat Lien

Technology Implementation System

Implementing New Technology? 

Try using a T.I.S. (Technology Implementation System)

So you’re about to implement new technology in your organization and you’ve done all the hard work of performing the research, comparing different solutions and after the exhaustive debate, everyone has finally agreed on one. Now what? The bad news is that was the “easy” part. The good news is successful implementation doesn’t have to be a roll of the dice. Just follow these 6 principles to ensure success.


Vision

Get everyone 100% on the same page with where you’re going with the technology and how you are going to get there. This should also align with the overall Vision and goals of your organization as a whole (dare we say ‘holistic’?). What does sound implementation look like in a few months, 1 year, 3 years and so on? 


People

Surround yourself with the right people in the right places, doing the right things. Achieving the vision means having the right team for success (that shares the same vision). Identify the roles required, then assign names to roles (more than one person can take on a role, however, a role should only have one person assigned for ultimate accountability; more on this in a bit).


Data

Cut through all of the feelings, personalities, opinions, and egos, boiling it down to a handful of objective numbers that give an absolute pulse on where things are. Touch bases with these metrics on a weekly basis. If you’re not hitting these numbers, then take the next step.

Doing the three things above will start to uncover the hurdles that you will have to overcome for 100% adoption.


Issues

Become great at solving problems, one person owns the issue and identifies it (with the help of ‘data’ from above), drill down to the core issues and work together to resolve them once and for all. Use sticky notes and implement “yes and also” strategy so ideas don’t get kicked to the curb.


Processes

Systematize by identifying core processes that define how this particular technology is to be implemented. Get everyone on the same page with essential procedural steps, publish them as a “living” document, and make sure everyone follows them to create consistency and scalability.


Accountability

Disciplined execution is what turns ideas into reality. Take massive action, identify who’s doing it, get feedback and repeating it all over again is the road to successful implementation. 

We’ve glossed over these steps however each one can take some time to implement. Feel free to contact us for help in creating your Technology Implementation System. 

Read More

Most Recent Revit Versions Reviewed

If you’re like most of us, we usually wait awhile before migrating to a later version for the following reasons:

  • It’s a one-way street with upgrading and since you can’t go back, we want to make absolutely sure.
  • It may take a while for consultants to get on board.
  • New releases often have some untested issues so best to wait until the dust settles and the first hotfix is released.

However, with the latest release of Revit 2019, we thought it would be a good idea to cover some of the more useful improvements since 2018. With all the dot releases in between, it’s easy to lose sight of the time-saving features that we may have missed.

Revit 2018 extends the power of global parameters, which help embed design intent in a model to also apply to radial and diameter dimensions and equality constraints.

Revit 2018 now includes the ability to schedule and add parameters for links and groups, helping you to better understand and quantify a project.

Select Model Groups or Revit links as categories when creating a schedule

Select Model Groups or Revit links as categories when creating a schedule

Revit 2018 introduces a new Multistory Stair object that enables faster and easier modeling of complex stair towers for buildings with many stories.  By connecting stairs to the levels in a project, you can model one stair and expand it to the entire building. When levels of your building change, the stair will automatically update as well.

Add and edit stair towers in multi-story buildings

Add and edit stair towers in multi-story buildings

Further improving stair design for multi-story buildings, the railing tool enhancements let you add accompanying railings to an entire stair tower with one click and propagate edits from one instance to all in a group of similar stair runs. Beyond modeling railings associated with building staircases, with Revit 2018 you can also attach railings to topography to model fencing, road barriers, or outdoor handrails.  This continues the work we did in 2017 and 2017.1 to make modeling railings easier and simpler.

Add railings to a stair tower with one click. Attach railings to topography to model fences or outdoor handrails.

Add railings to a stair tower with one click. Attach railings to topography to model fences or outdoor handrails.

The ability to model in perspective view released with Revit 2017.1 reduces the need to switch views to perform everyday modeling tasks and work in the view that best supports your workflow.

Revit 2018.1

The new schedule management in project browser feature — we know you’ve been asking for this schedule browser.  This feature lets you apply project browser organization to schedules.  Reducing visual clutter makes it easier to find schedules, especially in large projects.

Additional ready-to-use content delivered with Revit 2018.1 is especially helpful for new users and Revit LT subscribers wanting to get started fast. Content includes office cubicles, furniture, residential and commercial windows, and an appliance library.  Download the content from the Autodesk Knowledge Network.  

With the new Visual Materials API, you can create and edit Appearance Assets — the particular instances of classes representing visual material properties– of materials in Revit. Another top customer request, the opening of the materials API allows the automated creation of materials libraries and better transfer of material information between products. Now you can use any third party tool to make changes to material finishes.

Revit 2018.2

  1. Improved Section box controls
    We’ve improved section box grips (or controls) so that they are easier to select. This should make manipulating section box edge locations much easier and make it so that you don’t accidentally select something you did not want to.

    Improved section box controls

    Improved section box controls


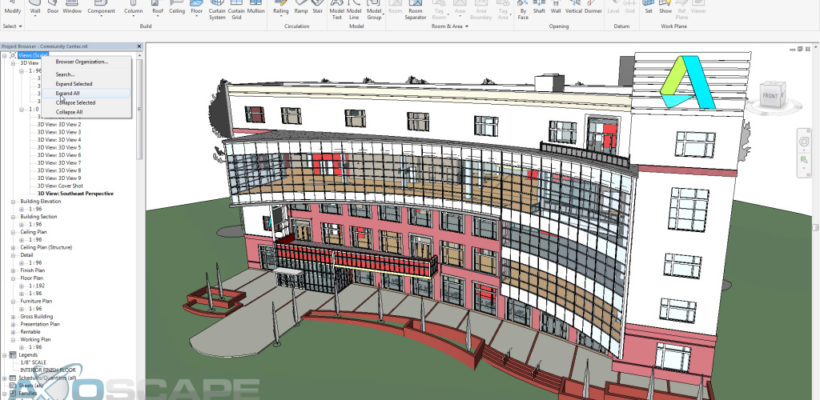
  2. Project Browser Expand and Collapse
    We’ve added new right-click menu options that allow you to expand or collapse everything in the project browser at once or just for the selected item in the tree.

    Project browser expand and collapse

    Project browser expand and collapse


  3. Improved Fill Pattern Dialog
    We’ve replaced the old fill pattern dialog with an updated dialog that has the solid fill pattern at the top of the dialog, the ability to search for patterns, allows for multi-selection, deletion of patterns, and is resizable (remembers its size).  Finally, when you’re editing a pattern, the dialog allows you to scale the pattern without having to reload it (plus it automatically previews the scale change). These changes reflect a number of different requests and should make working with fill patterns easier.

    Fill pattern dialog enhancements

    Fill pattern dialog enhancements


  4. Remember the Last Location for Loading Families
    This enhancement remembers the last location from which you loaded a family the next time you go to load another family. This should make it easier to navigate to the location where your families are stored when working with them on a project.

    Revit 2018.2 remembers location of last family loaded

    Revit 2018.2 remembers the location of the last family loaded


  5. Remember Column width spacing in Type properties dialog
    In what is really more of a fix than enhancement, we are bringing back the functionality that remembered the column widths of the family types dialog when editing families.

Revit 2018.3

  • Added connection to Next Gen BIM 360 for cloud worksharing, which allows flexible access permissions for cloud workshared models within the same project.
  • Updated the Scope Box drop-down list in the Properties Panel to display the scope boxes in alpha-numeric order.
  • Improved the pipe sizing feature by basing the size of a single pipe attached with taps or analytical pipe connections on the worst case.

Revit 2019

Many of the features new in Revit 2019 contribute to your ability to more efficiently and intuitively create information that captures design intent.  With features to control view graphics, let you work in a more modern immersive 3D environment, and communicate better visually, Revit 2019 helps you do your core work.

Get greater control overview graphics with “or” in filters

The variable “or” to view filters gives you greater control overview graphics by being able to create view filters with multiple rules and nested sets with the combination of AND and OR conditions.

Make the most of your working space with tabbed views & multimonitor support

Recognizing that you work with multiple views open at once and are looking for better ways to manage them, new Tabbed Views in Revit 2019 deliver a more modern experience that lets you maximize your working space. You can arrange and organize views exactly as you wish, and easily see which views are open at a glance.

Now you can drag views out of the Revit application window to secondary monitors, dramatically adding to your options for increasing and managing your working space.

Experience immersive design — do more of your modeling in 3D

Revit includes a few features that make it easier to create geometry and work in 3D views. With new Levels in 3D views, you can display and edit levels in any view, including orthographic and perspective 3D views, reducing the need to switch to 2D views to orient in a model.

You can work easier and faster with new full-screen uncropped perspective views that provide a more immersive experience when viewing and working within a model. Save time by easily toggling between default 3D and perspective views and moving around either view freely with navigation commands such as Zoom, Pan, and Orbit.  Scope box improvements provide more consistent behavior of levels across 2D and 3D views, further improving the experience of modeling in 3D views.  Scope boxes can be assigned to 3D views and they sort alphabetically.

Communicate design intent with more complex fill patterns and more life-like renderings

With new double-fill patterns, you can easily create more complex graphical renditions by applying both foreground and background fill patterns to materials and filled regions. You can use double-fill patterns on filled regions, visibility/graphics display overrides, object level overrides and for both projection and cut settings of materials.

Split railings

Use the Split tool on railing elements outside of the sketch mode and get more control of railings generated from the railing path.  Simplify the creation and modification of railings using the split tool to split railings with one click. When a railing is split, the resulting elements have path sketches independent of each other.


Works Cited

What’s New in Revit 2018?

The latest Revit 2018.1 update is now available

Getting to the small things that matter with the Revit 2018.2 update

Revit 2018.3 and Revit LT 2018.3 Updates released April 2018

What’s new in Revit 2019?

Read More

Why is BIM Important for Your Business?

Facts

Most owners don’t build enough buildings to fully understand the process, what all is involved, how long it actually takes, what could go wrong, and the ‘actual’ costs.

Cost overruns are so common that contingency fees average upwards of 5%. Some of these have to do with changes however most are due to:

  • Material waste
  • Rework
  • Poor communication between sub-trades

Therefore, there will be delays due to miscommunication between owners and architects, architects and contractors, and contractors and owners.


So what does the ideal project look like?

Crystal clear communication between all parties:

  • Expectations have been defined and clearly communicated
  • Everyone knows what to do and are in constant communication

The project schedule is realistic as all parties have a hand in creating it and have signed off on dates for deliverables. Also, only the necessary materials are used as waste is kept to a minimum along with a clean and organized job site.

How we get there

Owners should select their team as early as possible so that communication may begin right away. They could create a virtual mock-up of the project and make this an expectation from the beginning. Besides, a plan should be devised that includes schedules, execution, and development of objects in the virtual model.

A virtual model allows for:

  • Visualization
  • Identify issues (clash detection)
  • Explore “what-if” scenarios much quicker
  • Quantify materials
  • Run through 4D simulations

Hold collaboration meetings using the models as a tool, and have a cloud-based workspace (not just repository) so:

  • Everyone has access to the latest and greatest information
  • Minimize upload/download time (i.e. google docs vs ftp)
  • Leverage data for downstream uses:
    • Facilities management
    • Future renovation
    • IOT integration

Prefab based off of model components = higher quality, less waste, and controlled environments means less dependency on weather and more on-time completion.

Some people might have this question: Why not just make the architect or general contractors responsible for this?

Because they would not work well together. They have good intentions; however, let’s take a look at the differences:

Architects will focus on design intent. They charge by hours. They are concerned mainly with the design schedule.

Whereas, contractors will focus on buildability which is the easier, the better. They have fixed budget. They are concerned mainly with the construction schedule.

What is needed?

A third-party ‘referee’ that is impartial, that understands and has experience with all  parties:

  • Construction
  • Design
  • Operations

Someone who can facilitate the technology that makes all the communication and collaboration (not to mention dealing with all the different file types and software) possible.

Axoscape consists of experienced architects, engineers, and construction detailers and we will help you:

  • Create online workspaces that speak to your specific project and help you manage the organization, users, and permissions.
  • Create a living BIM execution plan along with LOD specifications by communicating with all involved that will be the central ‘truth’ for the project.
  • Perform daily/weekly coordination meetings to keep the schedule intact and hold all trades accountable.
Read More

Revit Disaster Recovery – How to Minimize Loss of Work

It seems like disaster strikes at the most inopportune time: While working on an important project, right before an important deadline, when you are doing multiple things at once. We have scanned the internet and could not find an up-to-date, article that addresses these issues in one place so here you go. This article will help you minimize wasting time and effort not to mention frustration when Revit crashes occur. We will discuss why Revit crashes in the first place, along with preemptive measure you can take to keep things at bay, and finally what to do when the “blue screen” of death occurs.
Why Revit crashes?

A bit of history concerning system recommendations. Throw the recommended specs out the window since they do not help (they do not address the types of projects you are working on and your specific demand for resources). Here are some rules of thumb that may help determine if your system is up to snuff:

RAM (File size and compression (20x rule))

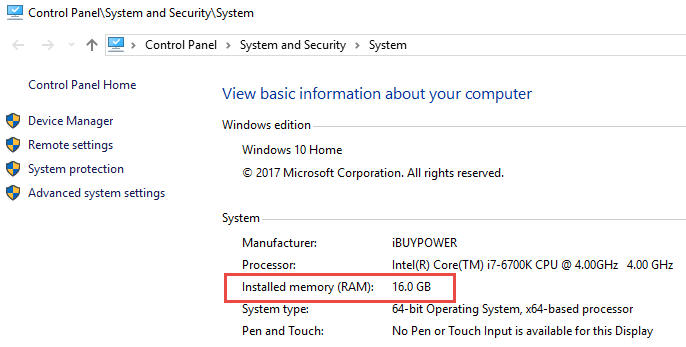
You may have heard of the 20x rule: Take your Revit project file size and multiply by 20, this is how much RAM you need just to run the current Revit session (not including all of the other background tasks you may have going on).

i.e. 100mb file x 20 = 2gb of RAM required

And do not forget the Linked File Sizes. You will need to multiply these by 20 as well since they all have to be loaded. It is no wonder you need to max out RAM. We recommend a 16gb minimum.
Hard Drives and Disk Storage (Virtual Memory)

So what happens when your computer runs out of RAM? It starts paging to the hard drive; however, if your computer is set to default settings, it may not meet the demand fast enough and things will come to a screeching halt.

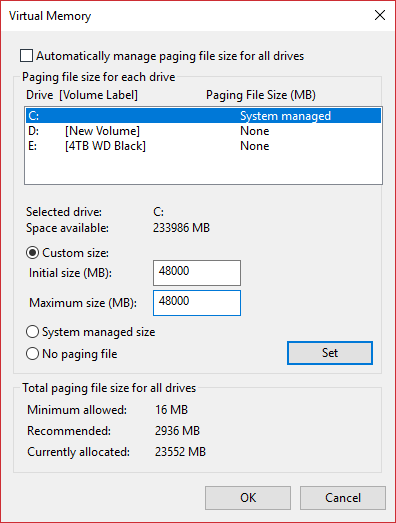
To prepare for this, do not let windows manage your page file size (those settings are for surfing the net and word processing, not demanding BIM Applications such as Revit and Navisworks and 3dsMax and Photoshop and Sketchup… etc.). Consult with IT before making changes to your PC if you are not comfortable doing so.

Set your Cache and Paging Size to three times the RAM (3x RAM)

i.e. 16gb RAM = 48gb page file size. If you do not have this, 32gb may suffice. Otherwise, get a new hard drive, they are cheap these days or opt for a speedier SSD which will improve overall performance as Revit is disk-write happy.
Quit unneeded applications:

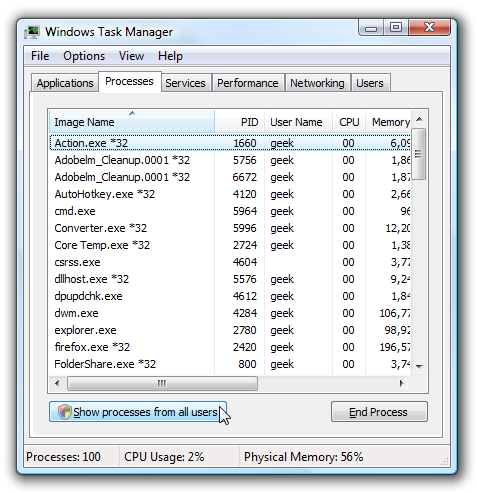
Sure it is nice to have that music video streaming in the background while you are working but not while you are opening a 500mb aggregate Revit file(s). Use the windows task manager (right-click on the windows taskbar) to see what is running and quit those other memory / CPU hogs:
Corrupt files or objects

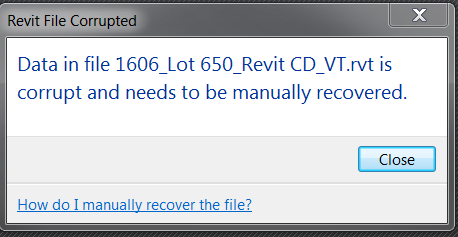
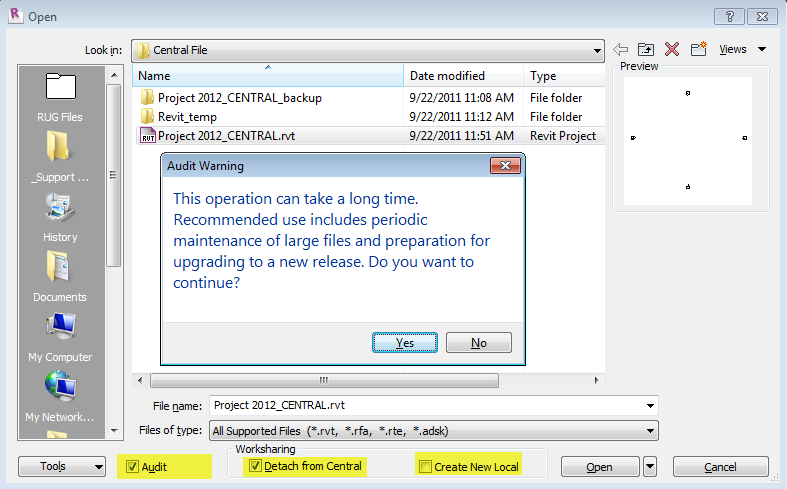
No one knows how this happens, it could be related to a corrupt family (see below) or a hiccup while syncing to central. The next time you open that file, click the “audit” option and be prepared to wait a bit longer than usual, however, it is a good way to identify issues before they get out of hand. That and some good ‘ol weekly Revit maintenance procedures such as purging items and keeping an eye on file size could be in order.
Corrupt family

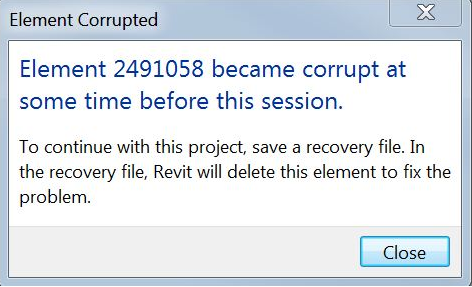
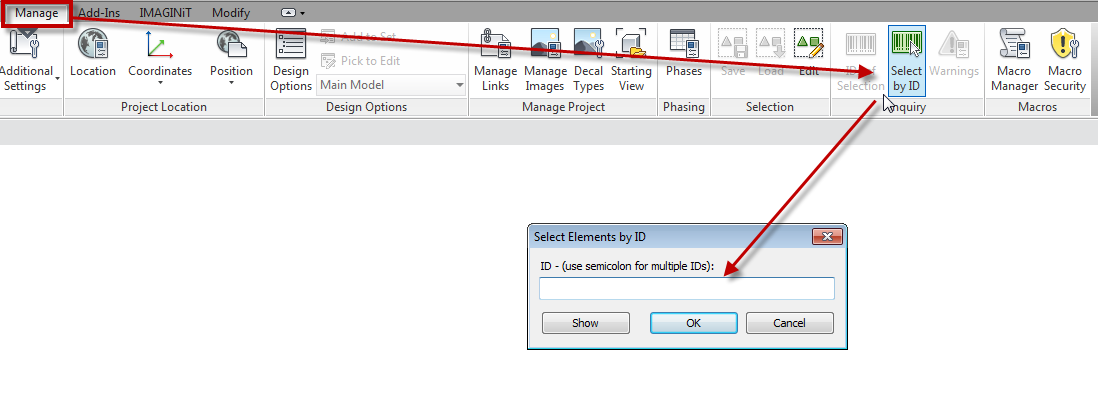
Just downloaded that awesome Revit family? It’s not so awesome now that it’s making things crash left and right. It could be that there are too many formulas or the hyperlinks exceed 256 characters or a number of items. When this happens, see if you can single out the culprit via element ID and modify it or get rid of it altogether (Oh and choose a more worthy source of downloading Revit families will ya? 🙂
Revit bugs

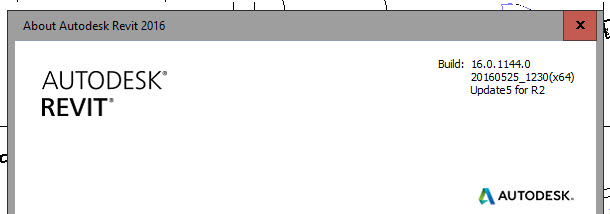
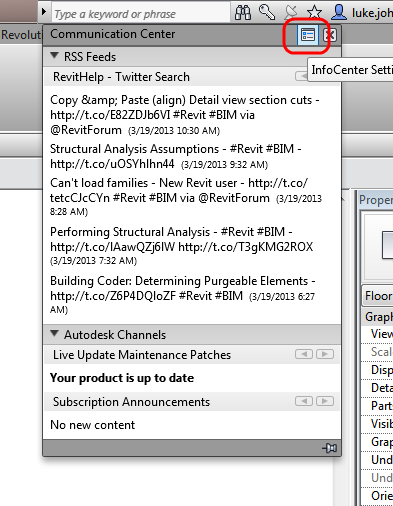
I know, I know.. Software is perfect and shipped bug-free right? In the “unlikely” event that you’ve come across a bug, I’m sure the software mfg would like for you to report it however if you are going to call support, you had better be on the latest version as that is the first question that the telephone operator is trained to ask. Identify your version by going to the help menu.. About; and/or check the InfoCenter to see if there are updates (it’s that satellite icon thingy, however, you may want to go directly to the Autodesk site just to make sure, and download other goodies while you’re at it).
 

How to avoid it?

Minimize data loss (Preventative measures)

As mentioned earlier, quit out of unneeded applications, set your page file sizes and heed the Autosave warnings:

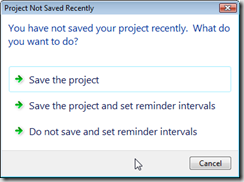
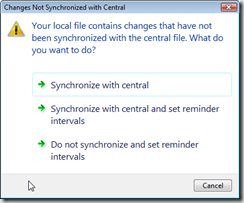
We know by now that there is technically NO AUTOSAVE in Revit (however perusing the Autodesk app store we did stumble across a promising autosave solution), always save/synchronize when prompted (you will be glad you did) or modify the notifications (every 30 minutes for saving reminder and 60 minutes for synchronizing).
When disaster strikes

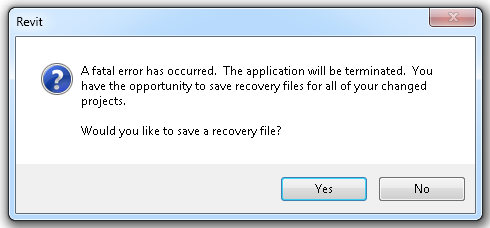
When things go awry, stay calm and Revit on…If you are one of the lucky few that are asked to “Save the recovery file?”, promptly hit “Yes” please. Then go look for a file with the suffix “_Recovery File” which should be in the same location as your original file.

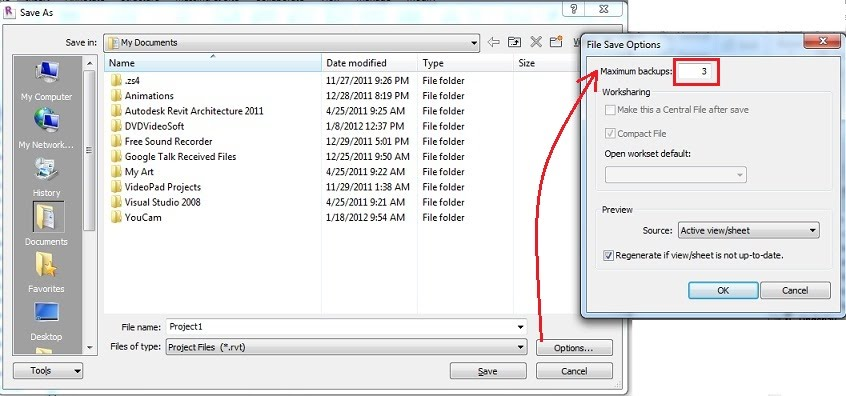
The next best thing is to salvage those saves if you followed our advice earlier, or refer to a backup if your file is corrupt. (FYI the number of backups for non workshared projects can be accessed through the options button located in the bottom right of the Save as dialog).

For Workshared or Central files, first, try to access your local file which may be more recent than the central file (especially if you followed our tip earlier regarding save reminders). Local files by default are in “my documents” or check the “default path for user files” in your Revit options:
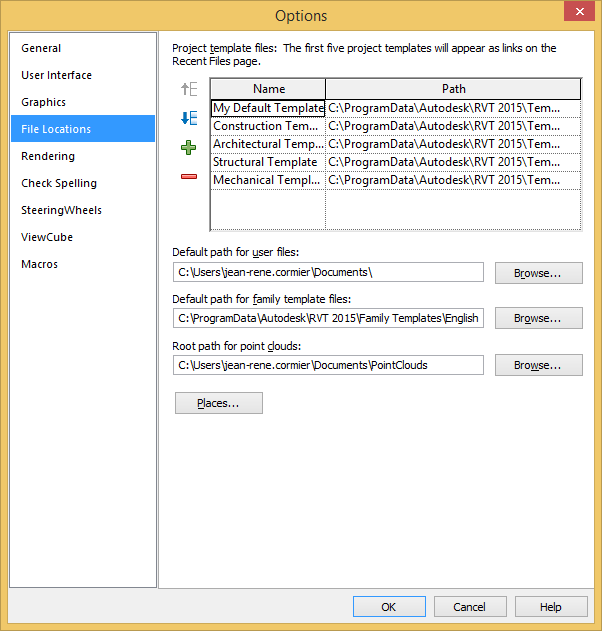
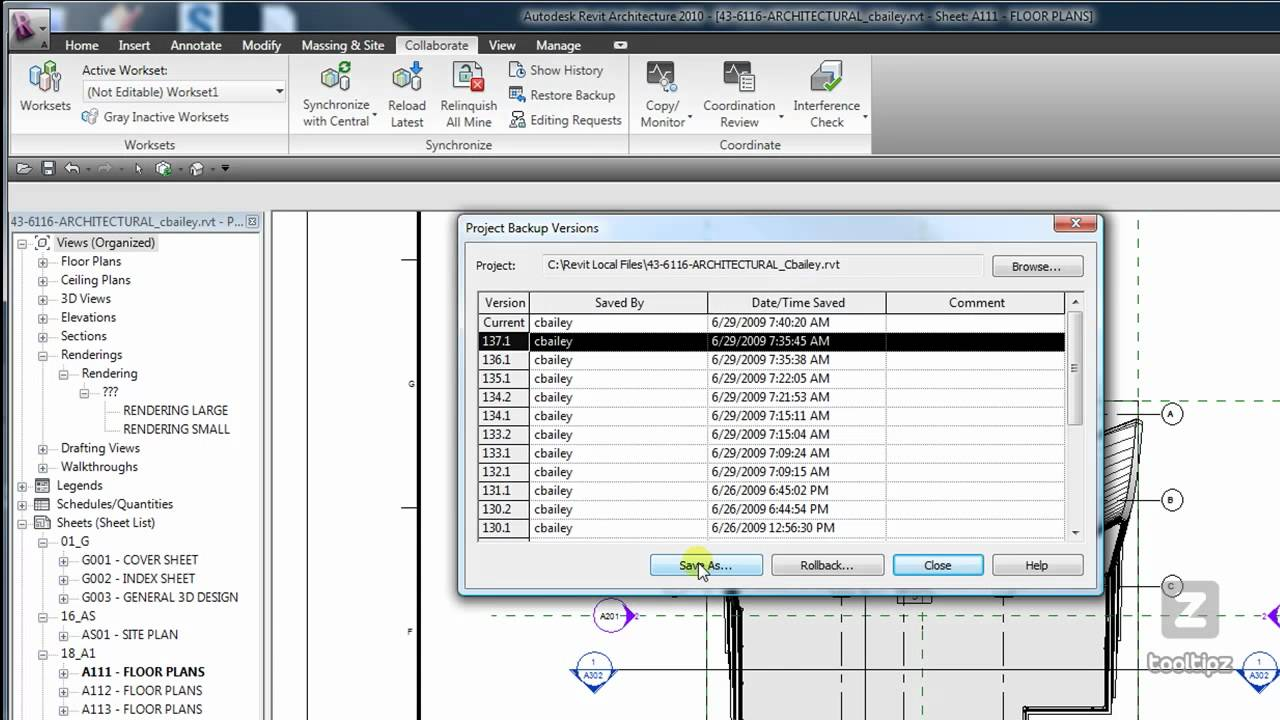
Both the local files and the central files backups are in the “<project name>_backup folder” and can be accessed from the collaborate tab using the “Restore Backup” command however never, I mean never “roll back” your project, unless you want to find a new career, instead, do a Save as and once the backup project has been analyzed, you can just make it the new central:

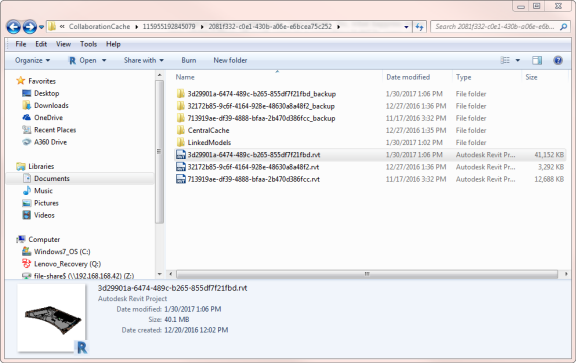
If you are using Collaboration for Revit (a.k.a. C4R), you can try to recover the local file referred to as the “local cache” file in the “collaboration cache folder”:

C:\Users\%username%\AppData\Local\Autodesk\Revit\<Autodesk Revit Version>\CollaborationCache

The filename, however, may be a bit cryptic so just sort by date and start by grabbing the latest one. This technique is especially helpful when you experience internet connectivity issues or when the C4R servers are down.
Journal File Location
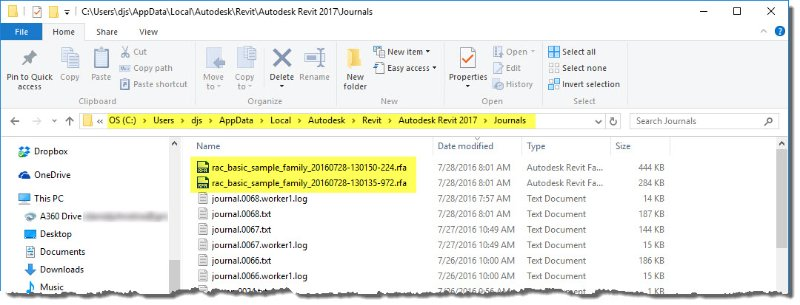
Another place to look for backup files is in the elusive Journal file location. Sometimes, Revit dumps data here, including a partial version of your file/family that may be open at the time. Journal files and their backups may be accessed at the default location:

C:\Users\<user>\Appdata\Local\Autodesk\Revit\Autodesk Revit (VersionYear)\Journals

Or

%LOCALAPPDATA%\Autodesk\Revit\Autodesk Revit (VersionYear)\Journals

What’s in the journal file?

The journal file contains much useful information which is the reason why support personnel may ask for your journal file to make sure you are on the latest build, you have the right hardware and resources and a clue as to what happened before the crash.

Revit Build

Hardware
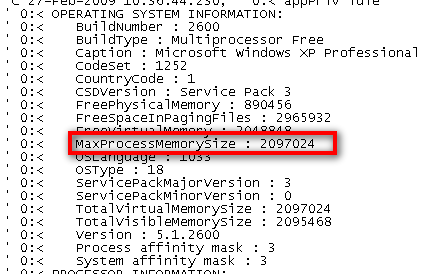
Memory

Errors

Recreate your last session on the fly via journal file.

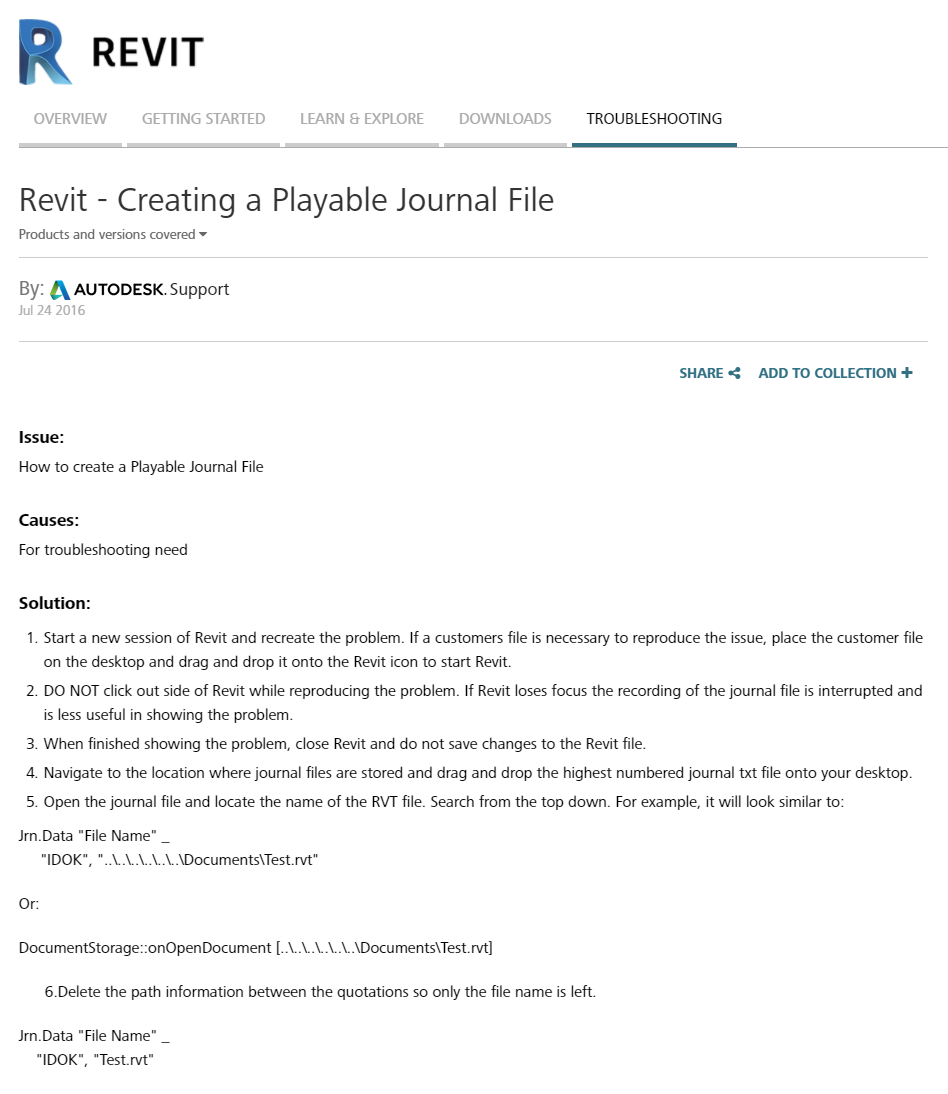
Many caveats here as you may have better luck getting Congress to pass a law or to agree on a new bill, however it is worth noting that you might be able to get Revit to repeat the last session by dragging the journal file onto your Revit icon. Before you rush-out and proclaim this as the new godsend, follow some of these steps to increase your chances of getting a journal file that will play all the way through (or at least as long as possible).

  1. First, follow the Autodesk article on Revit – Creating a Playable Journal File included here for your reference.
  2. Second, as finicky as the journal file is, make sure to:
    1. not switch tasks while in Revit and
    2. avoid moving windows around or
    3. resizing windows within a session.
  3. The fewer error pop-ups you have, the more success you may have at journal file playback.  
  4. Use keyboard shortcuts whenever possible (not only is this more efficient, but will rely less on mouse pointer positions and clicks)
 

Nothing ruins your day faster than crashing and losing a bunch of work. We hope you find some value in the tips and techniques to help ease the pain, if not, just an ample reminder for all the Revit folks from time to time is sufficient. Got a disaster recovery method that we didn’t mention? We would like to hear (and so does the rest of the world), so feel free to share!

Shoutouts:

@TheRevitGeek (Brian Mackey) for his awesome journal file class and insights at http://www.rtcevents.com/bilt/na18/

@revitclinic for the multi-part journal file story on http://revitclinic.typepad.com/my_weblog/2009/03/a-journal-file-story-part-1.html

Autodesk support and knowledge base https://knowledge.autodesk.com/support/revit-products/troubleshooting/caas/sfdcarticles/sfdcarticles/Revit-Creating-a-Playable-Journal-File.html

and the numerous folks who posted questions regarding Revit’s file recovery process.

Read More