How Revit’s Origin Works
Everything in this world has an origin, a starting point, including Revit. The origin point is useful in many ways to us, especially when there’s collaboration involve with a handful of users with multiple models in one project. It allows the user the ability to line up the models in various ways to make the modeling and noting process to run smoothly. Having the origin helps to coordinate with others a bit smoother, but it’s crucial to know how the models were built in order to link in Revit correctly. It’s just as important to know how to export the models as well in order to share the files from one user to another.
- The difference between linking models based off of the origin point, and also linking them based off of shared coordinates.
- How to set up a file with shared coordinates.
- How to export each method.
There are two different ways to link in Revit models into projects. Through shared coordinates and also origin to origin. The difference between the two is based on how the origin point is set up. When linking in a model through origin to origin, this is telling the model to use the same origin point as the reference point to line up both models. But when the user links in a model based on shared coordinates, it takes the origin point of one model and uses it as its own.
Setting up shared coordinates is a fairly simple process to go through. It may seem a bit complex at the thought of it but it’s really simple.

The image above contains a linked Revit file placed in at origin to origin. This will be the starting point for the shared coordinates process. One thing that will have to be verified by the user is the elevation. Some models might be slightly off axis. All that needs to be done to correct this is open an elevation/section view and line up the levels if need be. Once this alignment is done, the next portion that will have to get aligned is in a plan view.

Once everything is lined up the way it needs to be, click on the Manage tab, select the drop-down arrow underneath “Coordinates”, and click on “Publish Coordinates”. By doing this, it’s telling the file this is your new reference point.

Once the coordinates are published to the model, the file will have to be saved in order for it to retain those coordinates. There are two ways to save the coordinates.
1. By saving the file where the model(s) are pulling the coordinates from. This will prompt a window informing the user that it’s about to save those coordinates onto the file.

Click save and continue saving the project. Here’s a rule of thumb when it comes to this portion of the saving process. The file with the updated coordinates will need to be closed out in order for the coordinates to be saved onto the file, or else it will send an error message explaining why it’s not able to save the coordinates.
2. Saving the file through Manage links. I would recommend this when there are multiple models involved. Select the file(s) and at the bottom left-hand corner there’s an option to “Save Positions”. Click on that and the same save window will be prompt as it did on the first option.

There’s a difference when exporting each model. Similar to how each model is linked into the project there’s a slight difference in how it’s exported as well. See below.

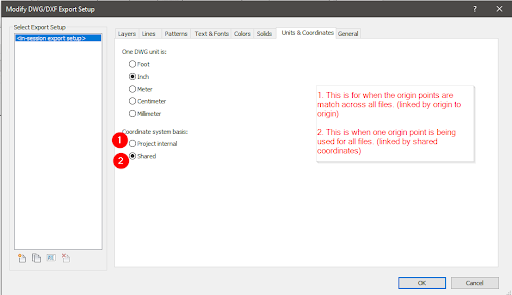
The most crucial part when it comes to exporting is selecting the coordinate system basis.

If the coordinate system basis is not set up correctly, then the model when linked into Navisworks, Revit, or AutoCAD will be floating out in the middle of nowhere.
I hope this was very informative, but just to recap on everything that we went over. The difference between origin point and shared coordinates. How to set up shared coordinate system. Last but not least how to export both methods out to a dwg format.